A few days ago, I chanced upon my old, shiny, red
Hanon
book
(online version). I remember my teacher assigning a couple of them to me but I never
understood the underlying principle of these exercises. After much
research around piano forums, I've realized that many pianists consider
the Hanon exercises as antiquated, unmusical, obsolete, a waste of time
and worse, injurious to one's hands
(click here for more info). I immediately dropped these
exercises but saved the scales and arpeggios.
Now, as a
mature pianist and having learned much over time, I leafed through the
Hanon book once again with critical eyes. Indeed, repetition of
predictable patterns is the key concept of the Hanon exercises. It's
just full of short and long repetitive figurations (trills, tremolos,
repeated notes) written in many permutations (but mostly in the key of
C).
The principle is the same as physically training an athlete
or working out in the gym. By doing repetitive drills, one's speed, stamina, and strength improve over a period of
time.
After
reviewing all of the exercises, I've arrived at the following
conclusions: 1) about 80% of the exercises are indeed a waste of time,
2) most of them seem to be illogically ordered; but 3) about 20% have
real applications in classical pieces.
I have picked 10
of the most useful ones, to be studied in the following order (please
see end of list for my practice suggestions):
1. #46 - The Trill
Virtually
all major composers (Bach, Beethoven, Mozart, et al) used trills
in their compositions. When properly executed, the trill mimics a bird
call or even a vocal vibrato. When combined with the right dynamics
and tempo, it has a penetrating effect on the listener.Technically,
the trill is one of those best-kept secrets in improving overall speed
and dexterity.
For this exercise, it is best to master them hands
separate (HS). The trill of outer fingers (5-4-3) cannot simply compete
with the trill of the inner fingers (1-2). On their own, they can
achieve a degree of speed not possible when played hands together (HT).
Play close attention to the following fingers: 5-4 and 4-3. Never trill
them too much as to strain them.
For beginners: The
exercise looks menacing and may be overwhelming for newbies. I suggest
you reduce the exercise as follows: eliminate the extra trills on the
3rd and 4th beats (i.e, just do 2/4 instead of 4/4 time). Work the first
6 measures only.
For variety: You could try the exercise one
octave lower. The hammers in the lower register are heavier, thus you
will encounter more resistance. It's exactly like working out on an
elliptical stepper. Once you're comfortable with a certain resistance,
you increase it a bit. You can also transpose this exercise in
practically any key if you get bored playing just white keys. Try in the
key of A and E.
2. #44 - Repeated Notes
There
are plentiful repeated notes in the music of Bach, Beethoven, Prokofiev
and other composers, often representing a drum or some percussion
instrument figuration. In some of Scarlatti's keyboard sonatas, they
mimic the strumming of a Spanish guitar or mandolin. A newbie is often tempted to
use only one finger for the repeated notes when different fingerings are
clearly written for each note. This simplification often results in the
loss of "color" of the repeated notes and a build up of tension on the
poor finger that plays everything.
For beginner: This
exercise is also best practiced HS and if needed, reduced to 2/4 from
4/4 (eliminate third and fourth beats). The first four measures are a
good warm up but once mastered, the student may simply skip this and
start on the fifth measure up all the way to the last measure of the
page. No need to do the repeat.
For the more experienced: After mastering the first four measures, skip to the second page. No need to do the repeat.
For the advanced: You may replace this exercise with #47. The repeat is unnecessary.
3. #6 - Basic Extension
There
is big stretch from the first note to the second note of every
measure--a sixth in fact. The real interesting thing are the inner notes
that descend from a fixed upper note (played by the 5th on RH and 1st
on the LH) in every measure. The descending notes are played by 4-3-2 on
the RH 2-3-4 on the LH, as if a mirror image. This figuration is very
common in Baroque and Classical period pieces (just look at some of the
preludes of Bach, sonatinas of Clementi, variations of Beethoven,
etc.).
If this exercise can already be played
perfectly, the pianist may replace this with #31. This time, the stretch
is an octave span. This should be very effective in preparing the hands
for octave studies.
4. #40 - Chromatic Scale
The
chromatic scale is one of those enthralling effects in classical music.
In Beethoven's Fur Elise, there is the ever famous descending chromatic
scale after the climax. Without a good grasp of chromatic scales, it is
hard to interpret the music of Chopin, Beethoven, Liszt and so many
others who exploited chromaticism in their music.
The
chromatic scale is actually easier to learn than the major and minor
scales because the thumb, wrist, and arm movements are simpler. In some
ways, it's a good preparation for the study of scales. Most chromatic
scales are played "leggiero" or light. To do this, practice each note staccato
in slow speed. As you increase speed, make the staccato lighter. This
should produce a "feather-like" articulation.
For beginners: Study "At an octave" and "In contrary motion, beginning on the octave".
For the advanced: Add "At a minor sixth" and "In contrary motion, beginning on the major third".
5. #38 - Running notes
Every
pianist must eventually deal with rapid running notes. It's just part
of the trade. This exercise offers a fair introduction to the role of the thumb in facilitating the execution of running notes.
There are two schools of thought regarding the use of the thumb:
Thumb Under and Thumb Over.
I won't go into detail regarding the merits and demerits of each but
suffice it to say that from Hanon's thumb turning exercises (#32 to
#36), one could deduce that he advocated the Thumb Under method.
Whichever is most effective depends on the situation.
For the advanced: Play this C scale in interval of 10, i.e, the LH plays as is while the RH is raised a third up:
RH: e-f-g-a-b-c-d-e
LH: c-d-e-f-g-a-b-c
The fingering is also modified (numbers in bold are where the thumbs do their hard work):
RH: 3-1-2-3-4-1-2-3
LH: 1-4-3-2-1-3-2-1
6. #15 - Broken Thirds
Hanon
is spot on with this exercise. Thirds (double or broken) is just
everywhere in classical music and are one of the most difficult to
execute convincingly. When played well, they sometimes mimic laughter or
two persons singing together (tight counterpoint). It is said that Mozart conceded that his
rival Muzeo Clementi played thirds better than him. Fast scales in thirds are so treacherous that some virtuosos cheat
on the notorious D scale in thirds in the Brahms second piano concerto.
For the advanced: Add #50 (legato thirds) and #52 (scales in thirds).
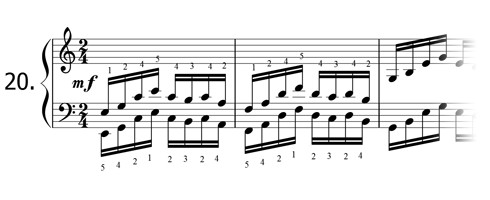
7. #20 - Little Arpeggios
This exercise runs through the arpeggios (broken chords) in the second inversion based on the C scale. These chords are the C major, d minor, e minor, F major, G major, A minor, and b diminished. The general awkwardness in the LH fingering (5-4-2-1) and RH (1-2-4-5) in playing the first beat of every measure is the main reason why this exercise has to be mastered.
As preparation, play each first beat as a block chord until the grasp of the chords becomes very comfortable.
8. #53 - Octaves
Some of the most memorable moments in piano music are the big, thundering octave passages, such as in the concertos of Tchaikovsky, Liszt, Saint Saens, and others. Pianists work on their octave technique for hours on end to achieve the desired effect. This exercise is a good stepping stone.
Start wtih chromatic scale in octave which is actually the last part of the exercise. Go through it slowly and try to bring out the outer notes, i.e., those being played by the 5th finger of either hands. When sufficiently mastered, start with the second page of this exercise.
9. #39 - All scales
10. #41 - All arpeggios
Perhaps the most important among all the exercises in the Hanon book are the scales (#39) and arpeggios (#41). So important are they that most conservatories and collegiate music schools require the prospective students to play them during auditions and with good reason. All the most essential technique are codified in the scales and arpeggios and together with octaves, thirds, and sixths, they make up for 80% of the technical difficulty in written music.
I will write a separate blog detailing my suggestions on practising scales and arpeggios.
When to take up the Hanon exercises: It makes sense to introduce the Hanon exercises after the third grade of the John Thompson method book or its equivalent. The student should concentrate on mastering the first eight exercises in the above list. To his/her delight, he/she may discover that the exercises will have prepared him/her well to study Beethoven's Fur Elise, Clementi's Sonatinas, and other intermediate level pieces.
How
to practice Hanon: Make sure you practice this hands separate (HS) first,
gradually speeding up without sacrificing note clarity and evenness.
Keep the wrist relaxed to avoid strain. When either
hands are sufficiently warmed up, play them hands together (HT) but
choose a speed that both hands can handle. This is normally slower than
either hands could achieve separately.
For
the more experienced: Instead of playing the exercises mechanically,
you may shape them through dynamics. Begin
softly (p) on the first measure, gradually do a crescendo, reaching a
mezzopiano (mp) after a few measures, then attaining an mezzoforte
(mf), then a forte (f) on the first descending measure. From here on, do
the exact opposite, i.e., a diminuendo, falling back to piano (p) on
the last measure. Also, try doing an allargando as you reach the high
point of the exercise, then resume "a tempo" until the last measure
where you may do a slargando.
For the more advanced:
Instead of a uniform crescendo from the first measure to the middle of
the piece, you can do a mini crescendo-diminuendo in every measure,
corresponding to the rise and fall of the notes within that measure. As
you move to the next measure, you begin with a volume slightly higher
than the first note of the previous measure, then proceed to do a
crescendo-dimuendo. The effect is like the rising and falling of waves.
On reaching the descending measure, apply the opposite dynamic, i.e.,
diminuendo-crescendo. Maintain a steady tempo all throughout. I would highly recommend using a METRONOME to reign in the tempo.